The most common type of writing is got to be horizontal writing where the texts, characters, and numbers originate from the left going to the right unless some adjustments have been done to the writing or paragraphing.
The horizontal writing format is common because it is easier to read and comprehend faster. The vertical writing format is not commonly used because it is hard to read and interpret. It gives the readers a hard time for they will have to write the characters horizontally for easier reading and understanding.
There are different writing formats as well as numerous font types. When texts are written vertically, this will mean that they originate from either the top to the bottom or from the bottom to the top. In most cases, the texts will move from the top to the bottom unless they have been rotated or subjected to some other manipulations.
Vertical texts are mostly used in writing the title of books and when you want to emphasize the wording of the texts. They are used in advertisements for products.
Below are some of the steps to go about transforming the texts to appear vertically, they may include the following;
How to write Text vertically in Excel
1. Open the excel sheet from your computer and write some texts on any cell. If you already have the data to transform you are good to go to step two. An example of the excel sheet is the one below.

2. The next step is to highlight the texts that we want to transform from vertical to horizontal. Because all the text appears on the first row, we select the first row.
After selecting, go to the Home tab

3. under alignment select orientation, it has the icon of (ab) and an arrow. Scroll down and select the vertical text.

4. The names will appear vertically from top to bottom on cells A1 and B1.

Once the vertical orientation is selected unless you choose another orientation, all the texts you write on the range will remain on vertical orientation for the entire excel sheet.
Using Text Alignment Method
1. Select a cell and pick a new option from the Orientation menu in the Alignment section of the Home tab and click on Format Cell Alignment.

2. Enter degrees or click and drag on the diagram in the Orientation section of the dialog box to set the text angle.
3. Press OK.

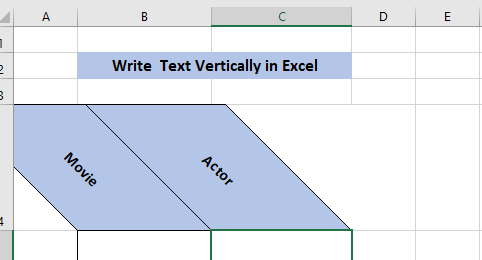
4. Change the orientation at the top row of a table to give it a stylish slant. Don't use too shallow an angle, stick to angles below -45 degrees, above 45 degrees or use regular horizontal text.
5. Double-click the column or row labels on a chart to set their orientation.
6. Click Text Options on the sidebar.
7. Open the Text Box section and pick a new Text Direction or set the Custom Angle.
Alternatively, you can select the labels and use the Orientation button, as you would when editing cells to pick a common angle, such as Vertical Text. Set a custom angle by using the sidebar.
8. Select a text box and drag the rotation handle in either direction to angle the box and its contents.

Write Vertically Using Orientation in Excel
In this method, you can focus on several techniques that allow you to write any text vertically in an Excel cell. These include;
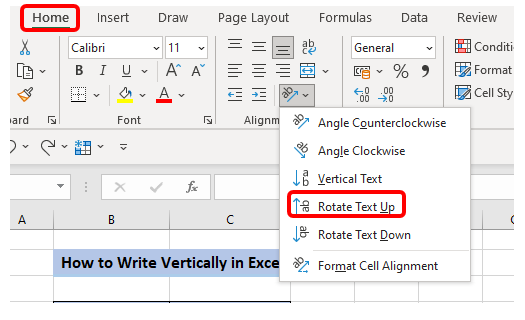
Rotate Text Up Orientation
1. Select the text you want to rotate up.
2. Go to the ‘Home’ tab in the ribbon and find the ‘Orientation’ option. In that option, you’ll get six different options.
3. Select the Rotate Text Up option.
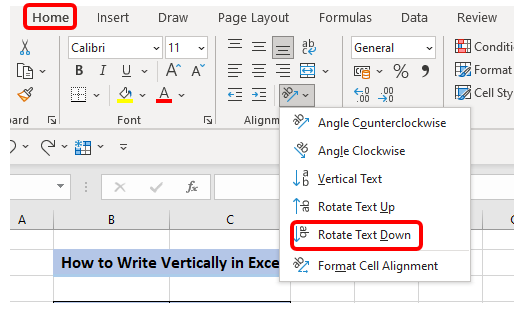
Rotate Text Down Orientation
1. Select the text just like we select cell B5 and cell C5 in the Excel worksheet
2. Select the ‘Home’ tab in the ribbon and find the Orientation option.
3. Select the ‘Rotate Text Down’ option.
Angle Clockwise Orientation
1. Select the cell and the text.
2. Go to the ‘Home’ tab in the ribbon and click on Orientation and select the ‘Angle Clockwise’ option.

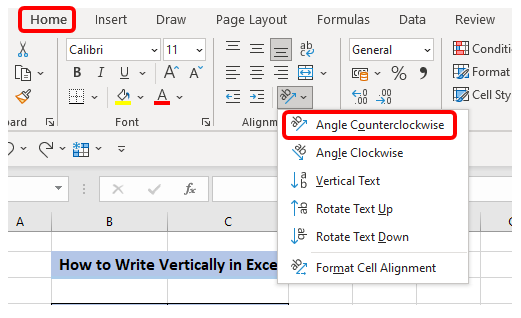
Angle Counterclockwise Orientation
1. Click on a cell and type the text that you want to rotate at an angle in the clockwise direction.
2. Click on the option with the letters 'ab' and arrow under the 'Home' tab > 'Alignment' section.
3. Select the option ‘Angle CounterClockwise’.
Rotate Text at A Given Angle
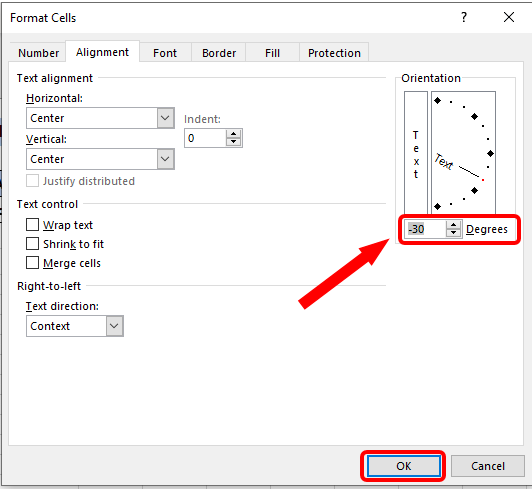
1. Click on a cell and type the text that you want to rotate at a given angle of your choice.
2. Under the 'Home' tab > 'Alignment' section, click on the option with the letters 'ab' and an arrow.
3. Select the option 'Format Cell Alignment.

4. Select the number of degrees at which you want the text to be rotated on the displayed menu.
5. Click OK.
Using WordArt
Steps:
1. In the Ribbon, go to the Insert tab and select the Text option.

2. Click on the WordArt option.

3. Choose the text style you want.
4. Type the text into the box.
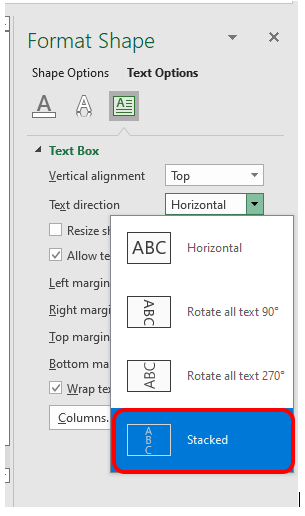
5. Change the orientation of the text by right-clicking on the box with text and from the drop-down list choose Format Shape.

6. In the Format Shape dialog box follow the following steps
- Click on Text Options.
- Click on the textbox icon.
- Click on the box next to the Text direction, and from the drop-down list.

- Select Stacked.
Write Vertically in Google Sheets
Steps:
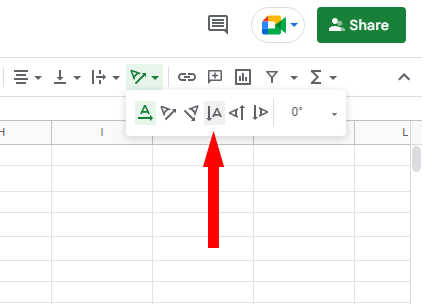
1. Select the text you want to write vertically.
2. Click on the Text Rotation icon in the Toolbar.
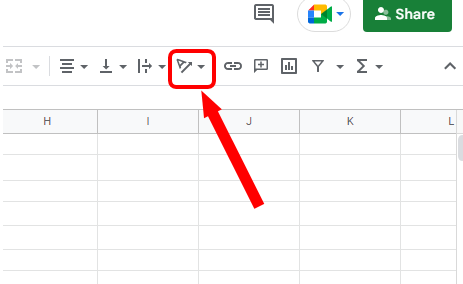
3. Choose Stack Vertically.
