One of the mighty ways of making Excel's texts and other values more visible is by adding space above and below the text. There's no direct way of adding space above and below in Excel, so many Excel users are unaware of this feature. Thankfully, this article will guide you on how to add spaces above and below texts.
Using the Text Box Tool
Here are the steps to follow:
1. Open the Excel application and place the cursor where you need to add the text box.
2. Click on the Insert tab on the toolbar, and locate the Text section.
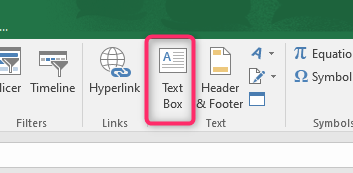
3. Under this section, click on the Text Box button. Using the cursor, resize the text box to fit the content you need to add.

4. Right-click on the text, and choose the paragraph button from the menu.
5. In the Indent and Spacing tab, locate the Spacing section. Then, click the Line Spacing drop-down button.
6. From the menu, choose the Double option. Finally, click the Ok button to save the changes.

Alternatively (Spacing Tool)
Here are the steps to follow:
1. Open the Excel application and place the cursor where you need to add the text box.
2. Click on the Insert tab on the toolbar, and locate the Text section.

3. Under this section, click on the Text Box button. Using the cursor, resize the text box to fit the content you need to add.
4. Right-click on the text, and choose the paragraph button from the menu.

5. In the Indent and Spacing tab, locate the Spacing section. Adjust the Before and After buttons.

Using Keyboard Shortcuts
When using this method, you will have to insert the spaces manually. Follow these steps:
1. Open the Excel application.
2. Click on the cell where you add your text.
3. Press the Alt + Enter key to add a new line in the Excel cell.
4. Enter your text in the line and place the cursor at the end of your text. Press the Alt + Enter key to add a new line in the Excel cell.
Now you will have an empty line above and below the text.
Using Text Box Together with the Wrap Tool
Here are the steps to follow:
1. Open the Excel application and place the cursor where you need to add the text box.
2. Click on the Insert tab on the toolbar, and locate the Text section.
3. Under this section, click on the Text Box button. Using the cursor, resize the text box to fit the content you need to add.

4. Right-click on the text, and choose the paragraph button from the menu.
5. In the Indent and Spacing tab, locate the Spacing section. Then, click the Line Spacing drop-down button.
6. From the menu, choose the Double option. Finally, click the Ok button to save the changes.
7. Click on the cell that you need to add a line. Right-click on the selected cell, and choose the Format Cells button.
8. In the Format Cells dialogue box, click on the Alignment tab and locate the Text control section.
9. From the section, check the Wrap Text checkbox. Finally, hit the OK button.
