Data entry in Excel may be time-consuming and tiresome. Thankfully, Excel has several useful tools and features that can be used to automate these tasks. Data Entry Form is one of these valuable tools. Data Entry Form automates and improves the information entered into spreadsheets. In this article, we shall discuss all the workarounds related to Data Entry Forms in Excel.
How to add Data Entry Form in the Quick Access Toolbar
To use the Data Entry Form, you need to add it to your Quick Access Toolbar options. Below are these steps to follow to do so:
1. Open the Excel application.
2. Right-click on the Ribbon and select the Customize Quick Access Toolbar option.

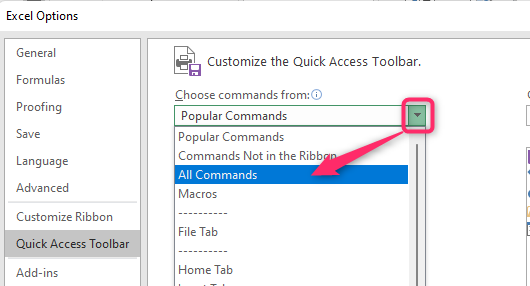
3. In the Excel Options dialogue box, locate the Choose Command from section, and click on its drop-down menu. From the menu, choose the All commands option.
4. Scroll downwards and locate the Form option. Click it and then click the Add button.
5. Then, click the OK button to close the dialogue box.
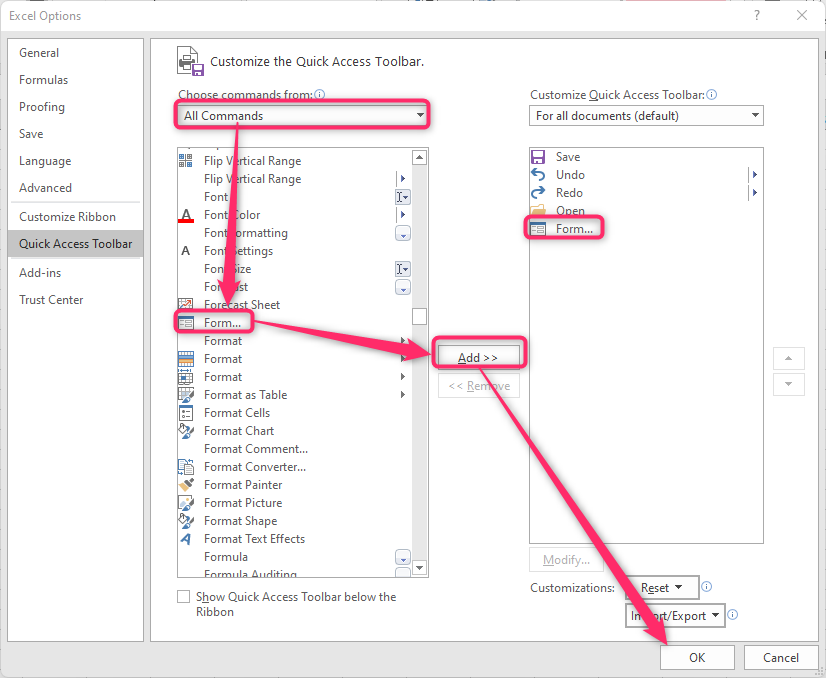
6. The Data Entry Form will be added to your Quick Access Toolbar.
To create and use a Data Entry Form
After adding the Form in the Quick Access Toolbar, let us now go ahead and use it.
1. Open a table where you wish to add the Form. To create a new table, click the Insert tab and select the Table option.

2. Then, click one of the cells of your table.
3. Click on the Form icon on the Quick Access Toolbar.

4. On clicking, a form will open. A form will consist of all the columns of your selected range or table.
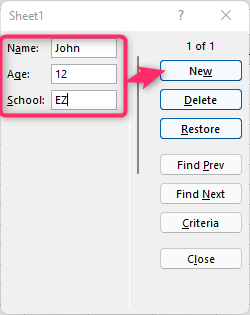
5. Fill in the Form in the empty text boxes. To go to the next row, click the New Button.
Parts of a Data Entry Form
On clicking the Form icon on the Quick Access Toolbar, a Data Entry Form will open on the Worksheet you are working on. A Data Entry Form has the following parts that every user needs to know.
Column details: This is the leftmost section in the Data Entry window. This section contains the details of the columns. It helps control and minimizes the errors that are likely to occur during the form-filling process.

New: This is the top button on the right side of the window. The button allows the user to move to the next row. After filling in the details of the first row, the user clicks the New button to move to the next empty row.
Delete: After filling in the Form, you may realize you have entered the wrong details and information in the text boxes. The Delete button allows the user to get rid of these incorrect details.
Restore: You can quickly restore the previous data when editing the Form. The restore button helps to minimize the time of restoring data. However, the restore option works if and only if you have not hit the New or Enter button
Find Prev: This button helps the user return to the previous entry.
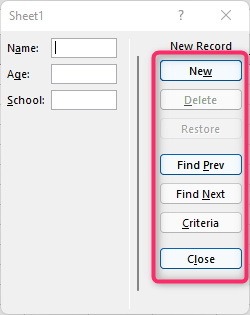
Find Next: This button helps the user to go to the next entry.
Criteria: This button allows the user to find or locate specific records in the list.
Close: This is the last button, and it is used to close the Form.
